Using source control in Eclipse with OSX’s built-in CVS
24 May 2006I've been using source control for a while now, but I've only recently discovered that my little iBook comes pre-installed with a working copy of CVS. In fact, Apple's developer site has a great article on how to set up CVS on OSX.
Unfortunately, the article doesn't take the user beyond using CVS at the command line. Ideally, you'll want to connect to your CVS repository using a much more flexible GUI tool. I forcibly recommend using Eclipse. The integration of CVS directly into an IDE has been a long time coming, but I can't give it up now that it's here.
There is, however, a trick to getting Eclipse to connect to the localhost repository. Enter the System Preferences menu by clicking [Apple] in the top left and selecting "System Preferences". Now select "Sharing" from the "Internet & Network" area. Under the "Services" tab, select "Remote Login" and press the start button.
Warning: Not only will you be able to SSH into your own machine, but anyone else with your password can as well. Enable Remote Login at your own risk. Check out this article over at Mac Geekery called Basic OSX Security for more information on securing your Mac.
Once you've enabled Remote Login, you can test it by going to the Terminal and typing ssh localhost. You should be prompted for your password, and should get a welcome message if you enter it correctly. Type exit to return. Congratulations, SSH is working!
The final step is to commit your Eclipse project to your newly created CVS tree. Now you can do this from the command line, but it's even easier in Eclipse.
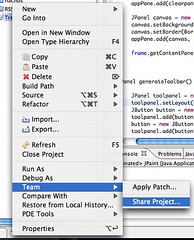
With your project open, right click on the project folder and choose "Share Project" from the "Team" menu item. Remember the Team menu item, this is where all your CVS functionality will be once you've got your project set up.
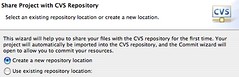
Choose the "Create new repository location" option and click Next.
At this screen, you need to enter the location of the CVS repository you wish to commit to. The host should be "localhost" and the repository path should be "/usr/local/cvsrep" if you followed the setup tutorial to the letter. Change it to whatever values you are using. Make sure "extssh" is selected in the connection type drop down!

At the next screen, I usually select "Use project name as module name", but feel free to enter whatever you like. After you choose your module name, click Next.
Eclipse will then connect to the server and create the module. When it returns, it will confirm with you the files that it will be committing in. Clicking Finish will finally bring up the Commit wizard which allows you to enter some text for a log entry. Something like "Initial check in" usually works great.
You should now be in Eclipse-y version control heaven! Enjoy the good life and happy committing!